The M241D brings digital printing technology to flexible film packaging applications, common in many food industries. The M241D uses contact coding technology, which means that the printhead and ribbon must touch the flexible packaging film to transfer an image.
Compared to traditional hot stamp coding, to guarantee the best digital print quality digital coding, the packaging material must be completely stationary when the M241D is printing.
Print defects are irregularities in the printed image compared to the M241D app designed image. These can be caused by many different factors related to the physical print process or how the M241D interacts with the host packaging machine.
Please complete the following steps before reviewing the specific print defect information below:
- Check the M41D has not been knocked or moved during general operation. This can easily be done when changing packaging material or machine maintenance.
- The first step is to reinstall the M241D using the gap setting tool following the installation guide.
- Rerun the M241D and review the printed image for defects.
- No defect - Issue resolved.
- Defect still present – Go to step 2.
- Do a manual test print using the M241D user interface. Refer to ‘How to issue a manual test print on an M241D coder’ for more information.
- Power off the Host machine and M241D.
- Ensure packaging material is under the printhead.
- Disconnect the I/O cable from the back of the M241D.
- Power up the M241D and wait for the green light after calibration.
- Press and hold the ‘vary’ button to trigger a manual test print.
- Review the printed image using manual test print:
- No defect – Defect being caused by interaction with the host machine.
- Defect still present – Go to step 4.
- Compare the printed image on the packaging material to the waste ribbon on the M241D – you should see a negative image of what has been printed. Is the defect on both the ribbon and the packaging material?
- Yes – Review the list of defects below and recommended actions.
- No – The defect is being caused by something external to the M241D and printing area. Check if the image is being smudged, rubbed, or scratched on surfaces after the print has been transferred.
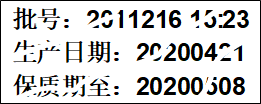
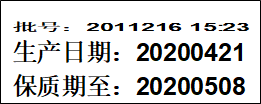
Default image for reference:

Table of example defects:
|
Image of Defect: |
Defect Description & Corrective actions: |
|
|
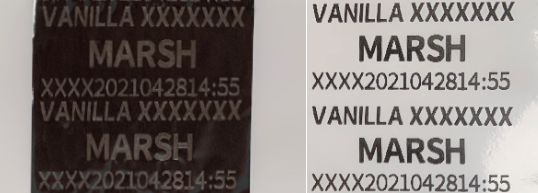
Missing /faded print across the printhead: 1. Check ribbon fitted correctly. 2. Check the coder position on the platen. 3. Check substrate fully under the printhead. 4. Check platen rubber for wear or damage. 5. Check coder alignment to platen using gap setting tool. |
|
|
Ribbon Creasing (Crazed/erratic lines in the image): 1. Check ribbon fitted correctly. 2. Check coder alignment to platen using gap setting tool. 3. Check if the coder is attempting to print when the flexible packaging is still moving. (check timings of the host machine.) |
|
|
A horizontal line through the print: 1. Clean printhead. 2. Check coder alignment to platen using gap setting tool. 3. Check platen rubber for wear or damage. 4. Check coder fixing screws are tight to the bracket and bracket components are tight. 5. Increase print pressure. 6. Increase print darkness. |
|
|
Faded Print (General low-quality printed image): 1. Clean printhead. 2. Check coder alignment to platen using gap setting tool. 3. Check platen rubber for wear or damage. 4. Check coder fixing screws are tight to the bracket and bracket components are tight. 5. Increase print pressure. 6. Increase print darkness. 7. Check if the coder is attempting to print when the flexible packaging is still moving. (check timings of the host machine.). The packaging material must be stationary when the printhead contacts the packaging material. 8. Try coding on another area of the substrate. |
|
|
Clipped print (missing print at start or end): 1. Check the printhead position over the platen for the complete print stroke. 2. Check horizontal registration position on M241D app. 3. Power down the coder and check the carriage has full movement and not be restricted. 4. Check coder fixing screws are tight to the bracket and bracket components are tight. |
|
|
Dead Printhead Dots (Straight lines through all lines): 1. Clean printhead. 2. Check platen rubber for wear or damage. 3. Replace the printhead
|
|
|
Compressed print (start/end/full): 1. Check if the coder is attempting to print when the flexible packaging is still moving. (check timings of the host machine.). The packaging material must be stationary when the printhead contacts the packaging material. 2. Try adding a print delay to ensure the packaging material is not moving. 3. Power down the coder and check the carriage has full movement and not be restricted. |
|
|
Scuffed print (Isolated defect on print): 1. Clean printhead. 2. Check platen rubber for wear or damage. 3. Check the path of the printed image through the host machine post after printing. The printed image might be being scuffed or rubbed by metalwork before the ink has fully dry. |